Here's a pictorial of the fairly major overhaul I completed to the far end of my layout. I had a single track loop with a single track running underneath at a lower elevation. After studying John Armstrong's book "Trackplanning for Realistic Operation," I decided to add two passing sidings to the existing loop. This would greatly improve my current operations and give a purpose to a space I really wasn't sure what to do with.
This shot was taken just after deconstruction of the loop began. The string was cut to the minimum length of siding I needed for my average train. I used it for placement of the turnouts to make sure I was allowing enough space for an entire train to be parked on the siding.

Here you can see the single track running underneath the loop to the yard in the background. The clock isn't there for a reason (though you can see how long I was working on this) -- that's just where it's always been.

Here's my visualization starting to take shape. What if...I ran multiple tracks underneath the layout by cutting out most of the center section and made the far side of the loop all trees so that it hid a good portion of the loop? You'd have trains roaring out of the forest around the bend. Down below would be a small power plant with two tracks for coal trains, one mainline to the yard and another that would run along the far side of the yard serving industry (or industries) made up of flats.


We've gone topless! Note the access holes I originally cut to get at any massive derailments under the foam. None ever occurred and I never used them. Now they'll be covered up as I daylight this portion of the layout. It's the first time this foam top has been off in probably seven or eight years. The only thing I found was a decent sized spider with a collection of dead roll bugs. Spidey got squashed. Sorry about your luck, Mr. Arachnid.


A view from the yard back through the layout. Those sand things to the left are my sand loads that fit in my hoppers.


Here I started doing some testing of track and temporarily put the top back on to make sure everything was going to fit right.


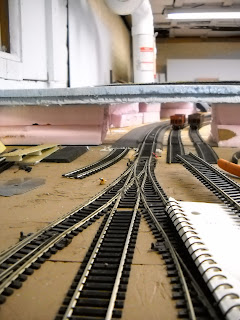
Here you can see the chalk lines along the existing main I drew to show where the new sidings would go.

Testing clearances with coal hoppers. Measuring is great, but I always recommend using a couple pieces of rolling stock as well to check "the look of the sidings.

The lower level track is nailed down and the top has been put back in place. Now I can work on the loops.

The power plant will be where the holes are. Probably the plant on the left with a big coal pile and unloading facility on the right. I'll use a retaining wall along the far side of the tracks.


The two coal tracks will just dead end here. Long enough for a full coal train, but not so long as to interfere with me operating the 3-way yard switch. Try to keep your access to your switches clear if you can. It will save you from knocking stuff over -- or worse -- knocking it onto the floor.

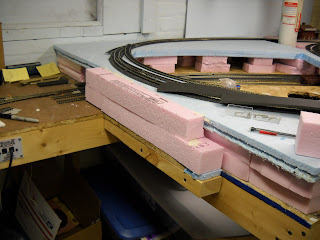
To get the outer loop in with a decent radius, I had to expand the footprint ever so slightly. I knew this going in though. A piece of 2x2 and some extra foam took care of it.

I started checking tolerances and look on the inner loop, which I completed first. I then moved to the middle loop which was -- and will continue to be -- the mainline.

Here, all three loops are in, the clock is out of the way and I've got a full train parked on the outer loop while an engine and a few cars makes the circuit. Remember to test your close tolerances with your longest engines and cars.


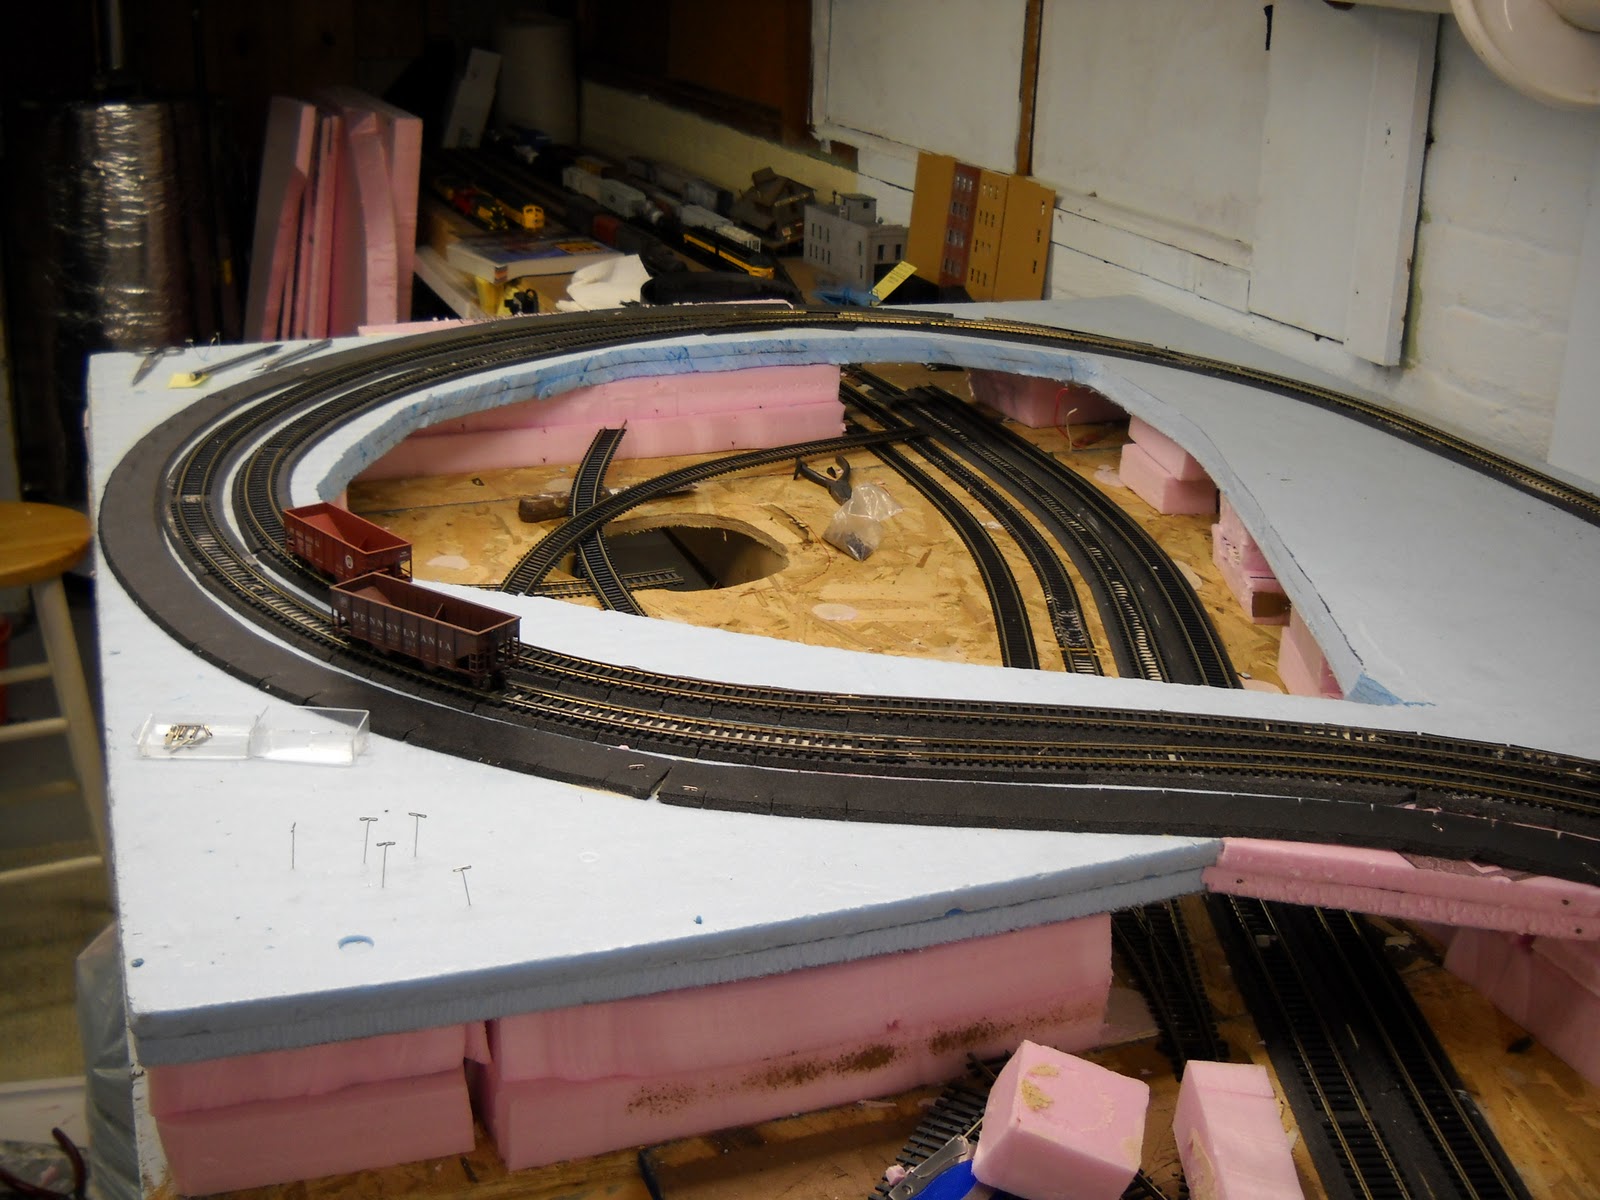
A better view of the finished product. I only ran the lower tracks through the overpasses on both sides. I'll connect them up later. I needed to get the loop done first -- it's my mainline and had the whole layout shutdown. Where you see the blue spray can in the background is about where another turnout will lead to a small grain facility with a small two-track yard -- maybe enough for 4-6 cars total. A livestock loading facility will be added either where the handle of my hammer is on the right or where the old Tyco livestock dock is in the far background. To the right of that will be a commercial district using leftover City Classics pieces and whatever else I have left in my parts box. The blue area left next to the A-A lashup and the space behind the white pipe will all be woods with an appropriate woods/hills/farms backdrop.

This shot was taken just after deconstruction of the loop began. The string was cut to the minimum length of siding I needed for my average train. I used it for placement of the turnouts to make sure I was allowing enough space for an entire train to be parked on the siding.

Here you can see the single track running underneath the loop to the yard in the background. The clock isn't there for a reason (though you can see how long I was working on this) -- that's just where it's always been.

Here's my visualization starting to take shape. What if...I ran multiple tracks underneath the layout by cutting out most of the center section and made the far side of the loop all trees so that it hid a good portion of the loop? You'd have trains roaring out of the forest around the bend. Down below would be a small power plant with two tracks for coal trains, one mainline to the yard and another that would run along the far side of the yard serving industry (or industries) made up of flats.


We've gone topless! Note the access holes I originally cut to get at any massive derailments under the foam. None ever occurred and I never used them. Now they'll be covered up as I daylight this portion of the layout. It's the first time this foam top has been off in probably seven or eight years. The only thing I found was a decent sized spider with a collection of dead roll bugs. Spidey got squashed. Sorry about your luck, Mr. Arachnid.


A view from the yard back through the layout. Those sand things to the left are my sand loads that fit in my hoppers.


Here I started doing some testing of track and temporarily put the top back on to make sure everything was going to fit right.


Here you can see the chalk lines along the existing main I drew to show where the new sidings would go.

Testing clearances with coal hoppers. Measuring is great, but I always recommend using a couple pieces of rolling stock as well to check "the look of the sidings.


The lower level track is nailed down and the top has been put back in place. Now I can work on the loops.

The power plant will be where the holes are. Probably the plant on the left with a big coal pile and unloading facility on the right. I'll use a retaining wall along the far side of the tracks.


The two coal tracks will just dead end here. Long enough for a full coal train, but not so long as to interfere with me operating the 3-way yard switch. Try to keep your access to your switches clear if you can. It will save you from knocking stuff over -- or worse -- knocking it onto the floor.

To get the outer loop in with a decent radius, I had to expand the footprint ever so slightly. I knew this going in though. A piece of 2x2 and some extra foam took care of it.


I started checking tolerances and look on the inner loop, which I completed first. I then moved to the middle loop which was -- and will continue to be -- the mainline.
Here, all three loops are in, the clock is out of the way and I've got a full train parked on the outer loop while an engine and a few cars makes the circuit. Remember to test your close tolerances with your longest engines and cars.


A better view of the finished product. I only ran the lower tracks through the overpasses on both sides. I'll connect them up later. I needed to get the loop done first -- it's my mainline and had the whole layout shutdown. Where you see the blue spray can in the background is about where another turnout will lead to a small grain facility with a small two-track yard -- maybe enough for 4-6 cars total. A livestock loading facility will be added either where the handle of my hammer is on the right or where the old Tyco livestock dock is in the far background. To the right of that will be a commercial district using leftover City Classics pieces and whatever else I have left in my parts box. The blue area left next to the A-A lashup and the space behind the white pipe will all be woods with an appropriate woods/hills/farms backdrop.

Parting thoughts: This was exciting because it's the first track I've laid in years. The new sidings will be used for a couple of things -- first, the local Chicago turn will bring the day's loads into one of the sidings, cut them loose,then move over and pick up the string from the previous day and head back to the yard. This opens up what was originally supposed to be a bypass track running behind my peninsula (not pictured) that I had to use as a storage track. Also, I can use one of the sidings as an interchange track between roads (I run CNW/CGW, CBQ, and PRR on my layout) rather than having to do it in one of the yards. And finally, if I'm running multiple trains, I can run them in opposite directions, using one of the sidings as a passing track, if needed. It's rare, but it does happen.
The added lower level tracks give me several industries for the CNW to switch, which had nothing other than interchange traffic before. It picks up a livestock loading facility (I already have meat plant elsewhere as a destination), a grain silo, a power plant (giving my coal hoppers some place to go) and whatever I make out of the flat in the yard (possibly an auto plant).
I forgot how finicky code 100 flex track can be when laying curves. I have to use T-pins stuck down in the foam to get it to hold it's shape until I can get the rest of it where I want. Only when everything is pieced together right can I take them out long enough to glue (using Liquid Nails Foamboard/Paneling adhesive) the track down and put some weights on it.
Comments