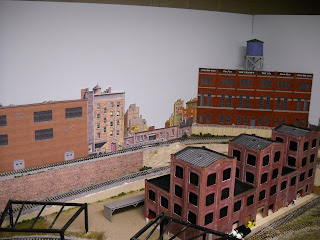
Backdrops add a lot of realism to a layout. The key is to achieve a layered look that gives your 2D backdrop a three dimensional look. Before I go any further, I have to say that everything I learned about backdrops came from John Pryke in his great book "Building City Scenery." OK, I learned a lot by experimenting too, but the basis of my experiments came from what I gleaned from Pryke's book.
The first step is to gather up all kinds of different backdrop materials -- making some yourself is an option as well -- from various manufacturers. I use the Walthers ones, homemade ones, RailScenes (not sure if I have the name right) and most recently, the great photo backdrops from King Mill Enterprises. You want to have as many on hand as possible so you can cut them out and mix and match to get the right look. Some buildings are larger than others from a scale perspective, so should go in the front. The smaller ones obviously go in the back. You can also glue the buildings to a piece of black foamcore to "pop" them off the layout to give them even more depth.
Another trick is to add a fence in front of your 2D backdrops. This will trick the eye into thinking there is more depth to the scene than there really is.
When you are layering your 2D buildings. remember to keep in mind how cities are laid out. Having two taller buildings with nothing in between them gives the illusion that there is a street in the distance. Here are some samples of my recent backdrop construction:
Note how I left a gap between the two higher rows to give the impression of a street in the distance. That's a real building to the right (duh), and Walthers buildings cut out and pasted in front. The rest are RailScenes (or whatever they are called -- I can't find the name and I'm not sure they are still made.)
The next building is made using Evans Designs Software and glued to black foamcore to give it a little dimension compared to the buildings around it. The fence to the left is a test placement -- it's printed on the computer and glued to mat board. The red and yellow buildings are more Walthers backdrops. Note how much better the buildings look when behind the fence.
Here are the buildings slightly further to the left. You have to play around with various pieces to really get the right feel. Some of the Walthers buildings got trimmed up a bit to lose details I didn't like or things that I thought were out of character with my era/place. Again, compare the fence area to that without the fence.
Here's a shot of the entire area -- excuse my tools and the empty viaduct. I was working on the brewery area (see earlier post) when I took this shot. Overall, some buildings look close, others look far away. The perfect 2D city.
Here's an angle with more 3D buildings visible to give a better idea of how everything works together. Next are several shots of Caitlin Chemical. I downloaded two images of tank farms from the Internet to use near my chemical plant. I broke up the two unrelated images with a KingMill building. The tank farm on the right is actually one image that I "flipped" using the mirror function. The actual dividing line is the gray tank in the center. By mirroring it, I was able to make it twice as long. Note the other KingMill building I used to transition from the Walthers 2D buildings to the tank farm. Note the fence in front of it -- a necessity because the image has a river or some body of water at the base of it.
I've since rearranged where the tanks are for the plant, but this gives you a good idea of how all the different types of images work together. Again, the key is to get as many as you can and play around with them on the workbench until you get something you like.
As for attaching them, I started off using spray adhesive, but it's tricky. You only get one shot to really get it stuck right and when you are leaning across your layout, it's easy to stick a building at a very unnatural 25-degree angle. My latest method is to use sticky tack -- that doughy stuff that's used to hang posters. I put little dabs of it at various parts of the image and then smoosh it onto the backdrop. If I don't like it, I can pull it back off. It also keeps the images ever-so-slightly off the backdrop enhancing the 3D effect. Just make sure you use lots of little dots of it or else it might curl when it gets a little humid.


Comments